Moving from a successful demonstration to an operational display network is a delivery project. Screens need suitable locations, sites need to be ready, content needs approval and support teams need enough information to manage the service. When those activities are treated as separate tasks without a shared plan, avoidable gaps can appear at installation time.
A multi-site rollout adds another challenge: small inconsistencies are copied across locations. This guide explains how to structure the work so that each site follows a dependable process while still allowing for legitimate local differences. The principles apply to signage, directories and related workplace display projects.
1. Set the scope, responsibilities and delivery boundaries
Start with a clear list of sites, displays and functions included in the rollout. Describe the intended use of each display and identify any integrations or content work in scope. Record exclusions so that an assumed task does not become an argument during delivery.
Name the business owner, project lead, site contacts, technical owners and supplier responsibilities. Include the person who can approve changes at each location. A project schedule is difficult to maintain when decisions about mounting, networking or content repeatedly wait for an unidentified approver.
Separate central standards from site-specific requirements. Shared naming conventions, approved templates and support processes may apply everywhere. Operating hours, local directions and physical installation constraints may differ. The plan should preserve useful consistency without pretending that every location is identical.
Maintain a decision and change log. If an additional display, content type or integration is proposed, assess its effect on time, cost and support before accepting it. This helps keep the rollout connected to the original business purpose rather than growing through a series of informal requests.
2. Survey each site and check readiness
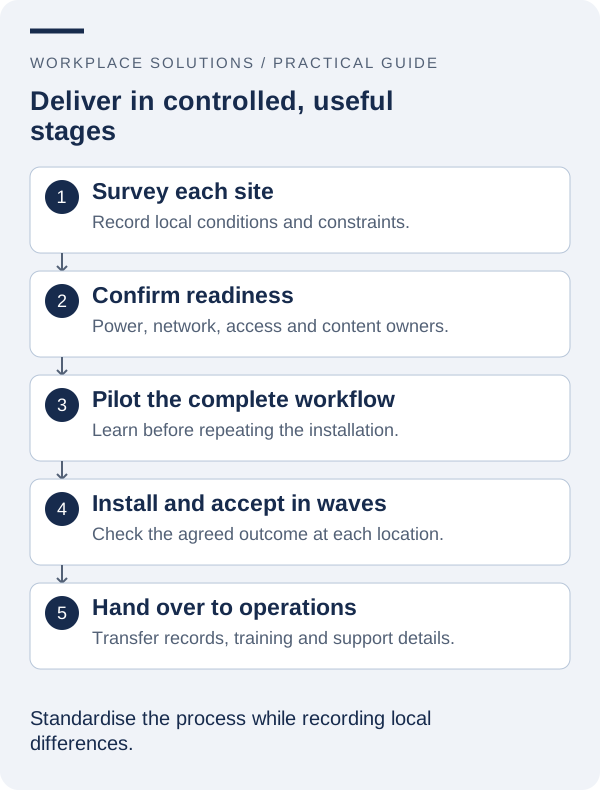
A site survey should confirm the intended position, viewing conditions, mounting requirements, available power, network arrangements and access constraints. Photographs and measurements are useful, but they should be accompanied by a named contact who can confirm local conditions.
Create a readiness checklist that must be completed before installation is scheduled. It should make clear which tasks are complete, which are outstanding and who owns them. A promised network connection or an unapproved mounting location should not be treated as ready simply because a delivery date is approaching.
Check installation access, local operating hours and any building requirements that affect the work. Agree on how equipment will be received, stored and identified. These logistical details may appear minor, but they can delay a site even when the software configuration is complete.
Record exceptions in a consistent format. A site that needs additional work should have a clear next action and decision date. This allows the overall programme to move forward without losing track of locations that cannot yet meet the standard installation process.
3. Use a representative pilot to establish the standard
Choose a pilot that includes the important characteristics of the wider rollout. The easiest site may not reveal the challenges associated with a public lobby, a remote location or a more complex data source. If the network includes distinct site types, a small number of targeted pilots may be more informative than one generic demonstration.
Test the entire service: equipment setup, content publication, local viewing, administration and support. Include the people who will carry out the work after launch. Their experience can reveal missing instructions or responsibilities that a supplier-led demonstration does not expose.
Use the pilot to finalise naming conventions, templates, configuration records and acceptance checks. Document changes while the reasoning is still clear. A standard that exists only in the installer’s memory is difficult to reproduce across several sites.
Keep pilot acceptance separate from approval for the whole programme. Review the results, confirm any limitations and decide what needs to change before scaling. That decision creates a more defensible basis for rollout than assuming that one screen showing sample content proves every site is ready.
4. Sequence procurement, configuration and installation
Build the schedule around dependencies. Equipment selection may depend on the site survey; configuration may depend on approved network information; content may depend on a completed template. Showing those relationships helps the team identify which delay actually affects the next stage.
Where appropriate, prepare and check equipment before it arrives at the site. Record its identity, intended location and configuration through an agreed process. Confirm the approach with the supplier and technical owners so that preparation does not conflict with local account or security requirements.
Group rollout stages in a way that leaves capacity to resolve issues. Installing every location at once can make a repeated problem harder to diagnose and correct. A staged approach allows the team to apply lessons from early sites without leaving a large number of locations waiting for the same fix.
Keep the schedule visible to site contacts and content owners, not just the installation team. A physically installed screen is not ready for public use if approved content, local instructions or an operational owner are still missing.
5. Prepare content and data before the screen goes live
Create a launch content list for each display or site group. Distinguish shared material from local information and identify the person who approves each item. Include fallback content and expiry rules so that the display remains useful after the launch announcements have finished.
Check location, tenant and room information against the approved source. A template filled with demonstration entries can look complete while concealing missing operational data. Use realistic examples early enough that long names, unexpected characters and different scheduling patterns can be reviewed before launch.
Confirm how local administrators will request updates and what they may change directly. A rollout can become inconsistent if each site invents its own publishing process. At the same time, legitimate local requirements should have an agreed route for approval rather than being forced into unsuitable shared content.
Review the displayed content at the intended viewing distance. The final check should include names, dates, instructions and links, as well as visual presentation. Correct information in the source file does not guarantee that it remains legible or complete in the screen layout.
6. Accept each site against observable criteria
Use a consistent acceptance record for every location. Check that the equipment is correctly identified, the intended content appears on the intended screen, and the nominated administrator can carry out the agreed tasks. Include relevant physical and technical checks assigned to the appropriate specialists.
Demonstrate a routine content change and verify the result locally. Where the scope includes an integration, test an agreed source change and its displayed outcome. Where a fallback process is required, confirm that the site team understands how to use it.
Record outstanding issues with an owner, severity and target action. Distinguish issues that prevent useful operation from smaller improvements that can be completed through an agreed follow-up. Acceptance should be a documented decision, not merely the point at which the installer leaves the building.
Obtain sign-off from the people authorised to accept the site. Keep the evidence with the project record so that support teams can understand what was installed and verified. This is particularly useful when a later fault needs to be compared with the original working arrangement.
7. Train the people who will operate the service
Training should reflect real responsibilities. A content publisher needs to create, review and expire messages. A local contact needs to identify the screen and report an issue. An administrator may need to manage approved users or support a supplier investigation. Those roles do not necessarily need the same session.
Use realistic tasks during training. Ask participants to update a local notice, recognise an incorrect entry or find the support instructions. The objective is to establish that people can perform the required work, rather than simply record attendance at a presentation.
Provide a concise handover pack containing location and equipment records, the agreed content process, support contacts and key operating procedures. Reference the approved system for credentials without copying secrets into a broadly shared document. Record who is responsible for keeping the handover material current.
Allow time for questions during the first operating period. Some gaps only become clear when staff work independently. A defined transition into support helps prevent the project team from becoming an informal permanent help desk with no clear ownership.
8. Review early operation and improve the next stage
Review the first sites before continuing at full pace. Look for repeated content problems, configuration differences, installation constraints and support questions. Separate a one-off local issue from a pattern that should change the rollout standard.
Measure progress using useful milestones: sites surveyed, sites ready, sites installed, sites accepted and sites handed into support. Counting delivered screens alone can make a programme look complete while significant operational work remains unfinished.
At the end of the rollout, compare the delivered service with the original scope and business purpose. Record remaining improvements and who will manage them. A final review should leave the organisation with a clear operating service and a manageable improvement list, rather than a collection of unresolved project notes.
Workplace Solutions’ project management and support services can be discussed alongside the selected display solution. Bring your site list, readiness information and desired delivery stages to the project conversation so responsibilities, sequencing and acceptance can be addressed from the beginning.